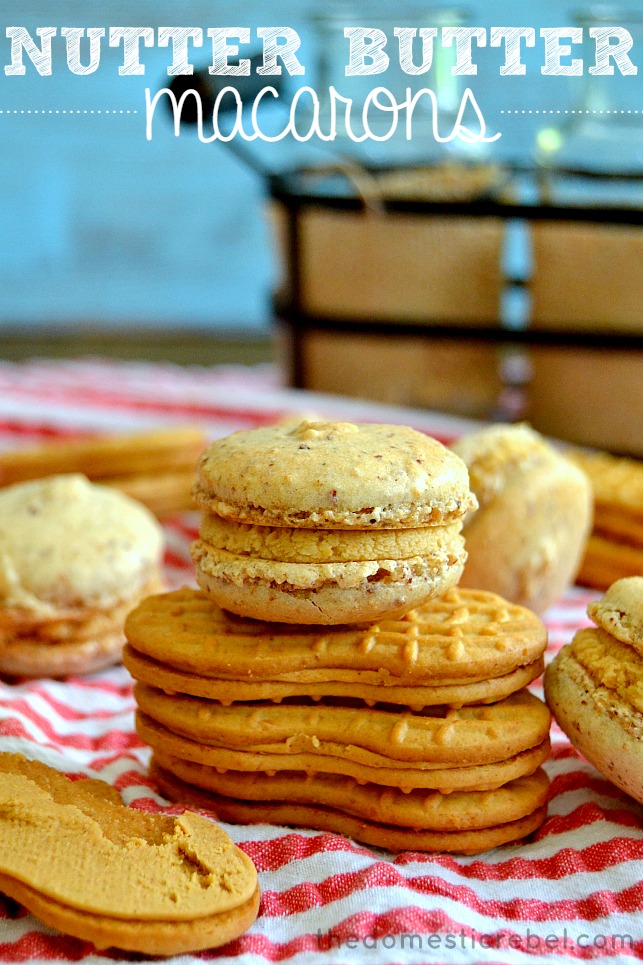
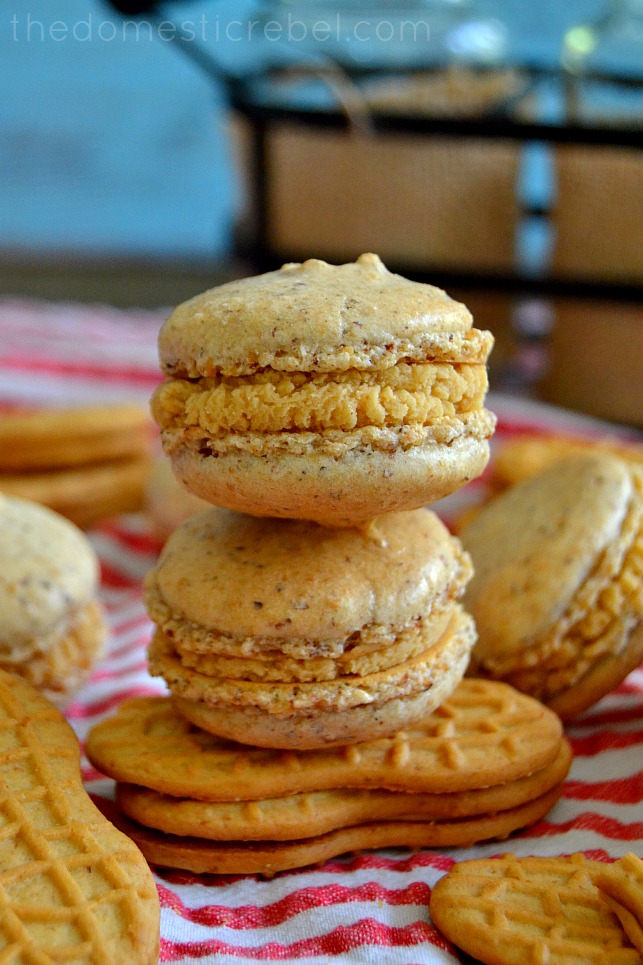
 You guyyyyyyssss. These macarons are everything. You hear me? Ev.Er.Y.THANGGGG.
I love contrast. It’s my favorite technique for editing pictures, and it’s my favorite technique to apply when eating, dressing, styling, and virtually everything else in my life. Like for instance, pairing a pretty pink tutu with a roughed up black motorcycle jacket and chunky black boots. The boots and jacket are so tough and edgy, but in contrast, the pink tutu, with all its frills and girlishness, is the perfect contrast.
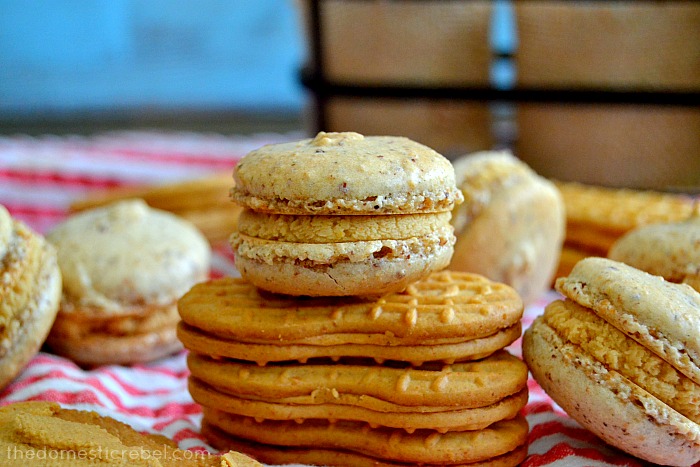
And like with polished, prim French macarons and all-American, easygoing Nutter Butters, combining the two is the perfect blend of both worlds. And seriously, these macarons may be some of my favorites ever. Like, of Laduree, Ginger Elizabeth’s, Dana’s Bakery, Macaron Parlour-ever. And that’s saying a lot since 1) I’m not French, nor a French chef (and I don’t even pretend to be one!), and 2) since I’m hardly qualified to be making outrageous claims like this, yet I am and I’m serious.
 I did a macaron tutorial in the past, but to be honest, I hadn’t yet perfected my method or recipe yet. My macarons of the past were still a little wobbly, had quite a bit of cracks, and just needed some more tweaking to be more like the French macaron they were destined to be. I know I sound like a mother of a macaron right now, watching her macaron children flee the nest into the world to carve their own successful destinies… I’ll stop.
 I figured I would revamp my tutorial to be as simple, clear, and precise as I could be to help you navigate the waters of macaron-making. Macarons are pesky little devils with high tempers. One wrong move here or there could send you with a tough, hard cookie, something that disintegrates, or worse – “Cajun” macarons, which I’ve made many times and they are as terrible as they sound.
BUT – with the right information, tools and tips you can successfully make French macarons in your own home without A) adopting a French person to help you, B) giving up and just buying Chips Ahoy, or C) having a temper tantrum and turning Cajun. (Not that turning Cajun would be a bad thing, but don’t be like the mad macaron).
**For this tutorial, I wrote it as if we were making basic macarons – not the Nutter Butter ones. I’ll throw in Nutter Butter steps here and there for clarity, but I want you to feel you can come to this tutorial for any flavor macaron you’re making. Capiche?**
Let’s get started!
For basic macarons, you’ll need:
 Almond Meal/Flour: I like Bob’s Red Mill because it’s finely ground and comes from blanched almonds, so there are no skins. However, for my Nutter Butter recipe I happened to use regular almond meal (meaning with the skins, which are just tiny brown flecks in the end product. Either one works, and the regular almond meal would work here since it adds to the character of the macaron (cookie crumbs + brown flecks from almond skin = no biggie). However, if you wanted something like a pure vanilla macaron, I’d stick with blanched almond meal for purity color-wise.
Powdered Sugar: This is essentially what your shell consists of – powdered sugar and a little almond meal (and for the NB recipe, some ground Nutter Butters). The powdered sugar is essential to making these crisp yet chewy cookies so delectable.
White Sugar: White sugar helps make the meringue which is what you fold into the sifted almond meal & powdered sugar mixture. I use plain white granulated sugar, but superfine or caster should work too.
Egg Whites: These are essential to macarons! Macaron shells are delicate, much like meringue, and egg whites provide that structure.
Remember: These are your essentials which will not change no matter what flavor you’re doing. For the Nutter Butter, I obviously added in Nutter Butters, plus the filling ingredients which are in the Recipe Box below.
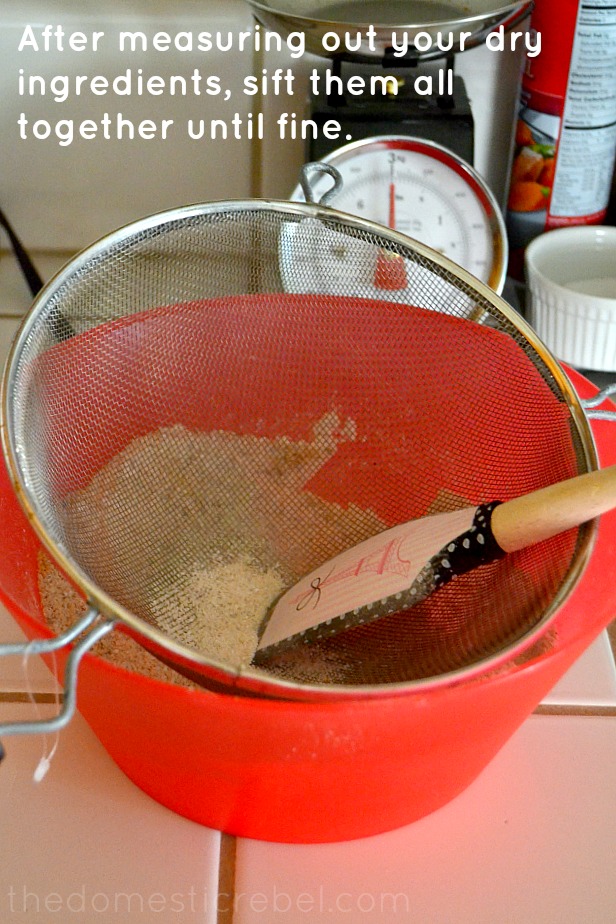 Sifting time! I like to sift my dry ingredients first so they’re totally ready to rock & roll when my egg whites are whipped. I simply combine the almond meal and powdered sugar in a large bowl (along with the cookie crumbs for this particular recipe) and then process it through a large sifter into a separate bowl. I’ve used both this large sifter and a hand-crank sifter and I prefer this larger one (less hand cramps!) You want it to be extremely finely ground with zero clumps or chunks of anything which could affect the structure or consistency of the macaron shell. For the Nutter Butter Macarons, I’ve sifted together 2 & 1/3 cups powdered sugar, 3.5 oz of almond meal, and 3.5 oz of finely ground Nutter Butters, which I pulsed into a fine crumb in my food processor.
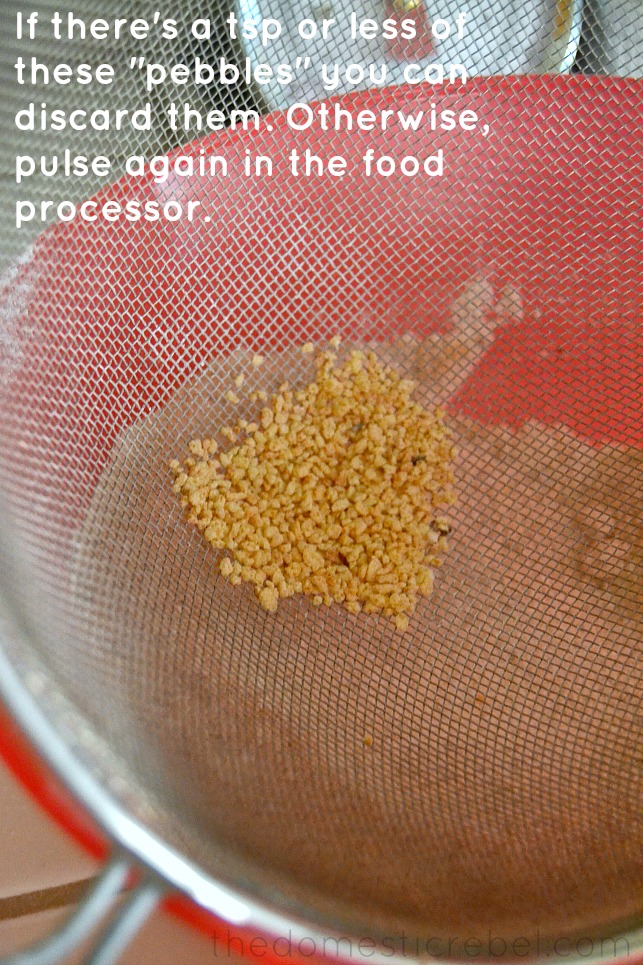 When you’re sifting, you’ll find these hard little “pebbles” in the bottom of your sifter. These are too large and hard to pass through the fine sieve, so you’ll need to do one of two things. 1) You can scrape your spatula over them against the sifter to try to break them down and get them to pass through; OR 2) You can add all the pebbles back into your food processor and grind them a little more so they break down. However – if there’s a teaspoon or less of the pebbles (here is a teaspoon, as shown in the picture) you may throw them out. Any more than a teaspoon and you’ll need to push them through or re-pulse them to grind them down.
Now, let’s move onto the meringue!
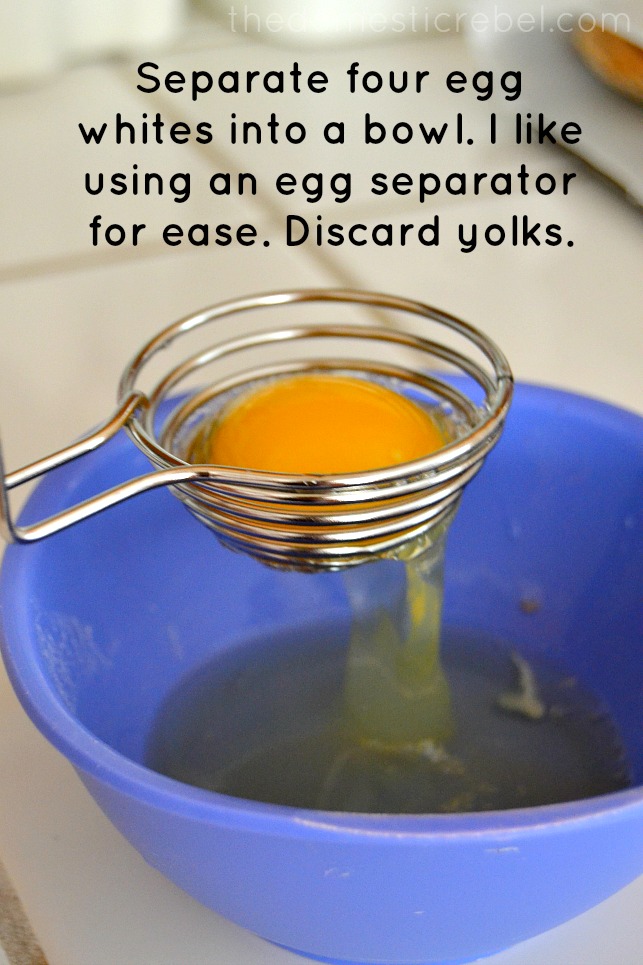 Separate four egg whites into a bowl, discarding the yolks. I love using an egg separator because it efficiently separates the whites from the yolks, so you get the maximum whites out of each egg.
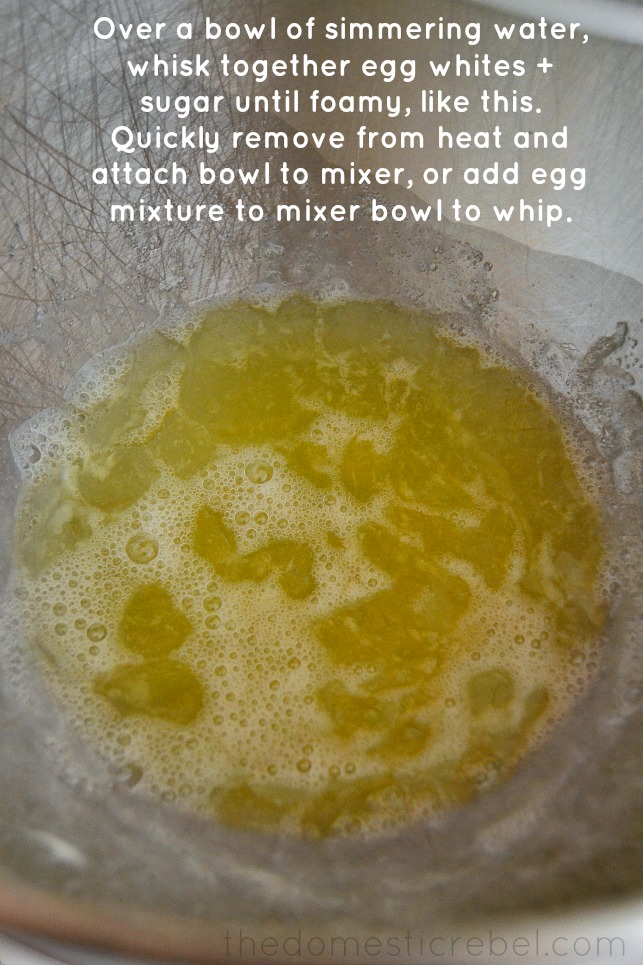 Now here’s the first step of the meringue-making part. If you’re using a KitchenAid Stand Mixer, this is even simpler for you. If not, listen along! Place a large pot of water (like 1-2 inches of water) on the stove and bring to a simmer. Place your KA Stand Mixer bowl on top of the pot so it nestles atop of the simmering water without the water touching the bottom of your bowl. Working very quickly, add in the egg whites and your 1/3 cup of granulated sugar. With a whisk, begin whisking the mixture until it looks like this – slightly bubbly and frothy. Any longer and you’ll risk making super sweet scrambled egg whites.
Once the mixture looks like this, immediately remove it from the simmering water, wipe off the bottom, and quickly reattach it to your mixer base. Affix the mixer with the whisk attachment. If you are not using a stand mixer, I’m afraid your hands are in for a load of work. Place a large heat-proof bowl over the pot of simmering water and follow the steps. Once the mixture is frothy, remove from the pot of water, wipe the bottom, and begin beating it with the whisk attachments on a handheld electric mixer.
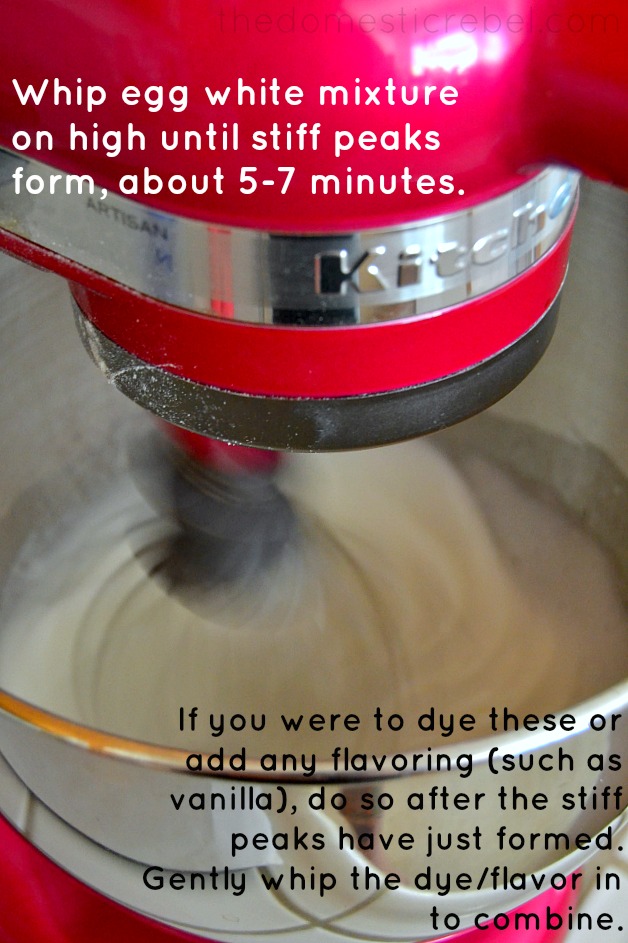 Begin beating the egg white mixture on HIGH for 5-7 minutes or until glossy, stiff peaks form. Check periodically to see if your egg whites are done so they aren’t over-whipped. Once the egg whites are whipped and have stiff, glossy peaks, you can now add your flavoring or dye if needed. For the Nutter Butter Macarons, I did not add anything in this step. However, if you were going to make, say, lemon macarons, you’d add in a couple drops of yellow food coloring and a small capful of lemon extract in at this moment. Beat very quickly to combine, careful not to overwhip.
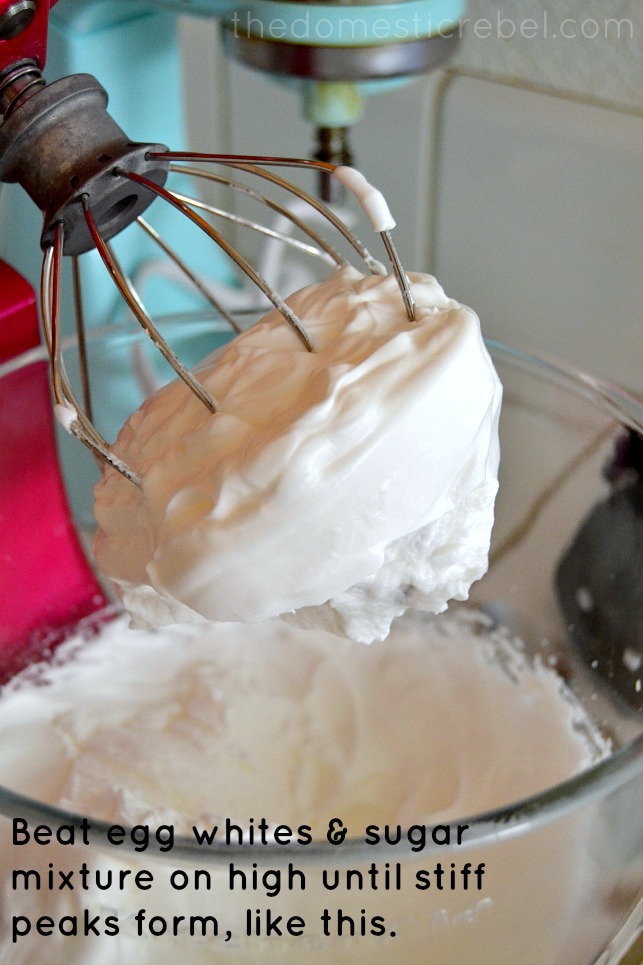 Beaten egg whites will look like this when they’re ready: glossy, stiff, and thick in volume. Not sure if your egg whites are ready? Simply take the whisk attachment off, and stand it up in the air. If the peaks begin to sag or fall, they need a little more whipping. If they stand straight up, they’re just right.
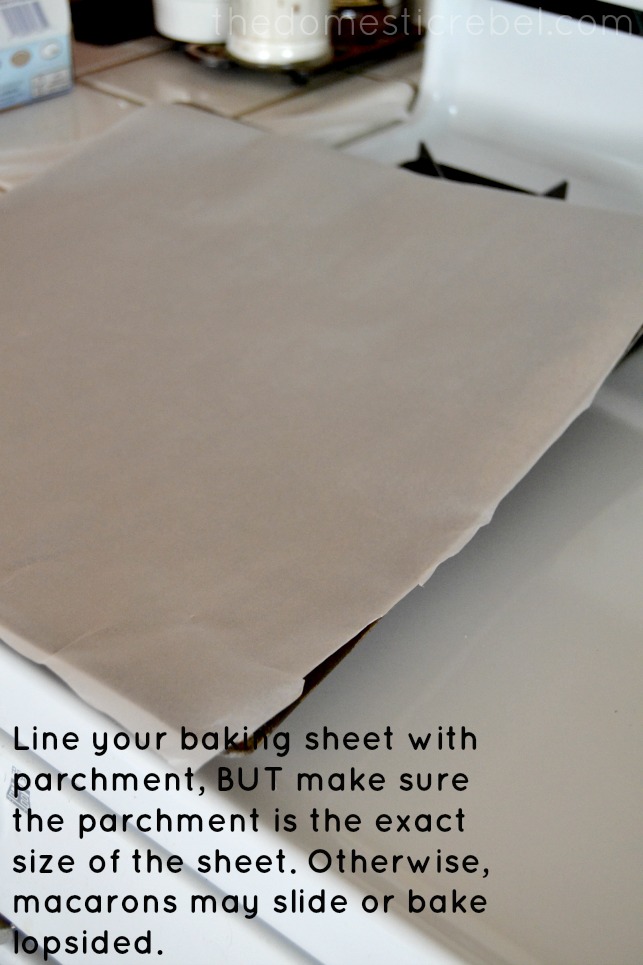 Before proceeding, make sure your baking equipment is ready. Line your baking sheet with parchment paper that is the exact size of your baking sheet. If parchment hangs over the edges of the baking sheet, macarons may slide when baking or they may bake lopsided, which makes them prone to cracks or not fully developing their “feet”, that crusty ridge around the base of any quality macaron. You may also use a macaron baking mat if you have one (and you can find them cheaply at most craft stores – I bought two 18-cavity macaron mats at Michael’s for $17 plus a 40% off coupon). Do not grease sheets, mats, or pans.
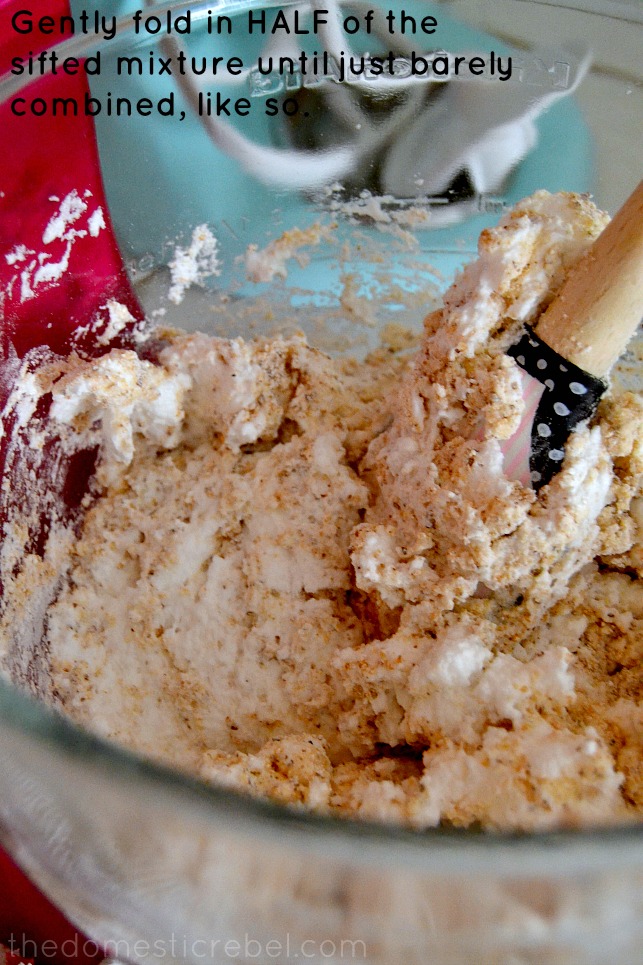 Take your sifted mixture and gently begin folding in HALF of the sifted mixture into the egg whites. You do not want to fully incorporate it – just barely, barely mix it in, like so. If there are patches of straight-up dry mixture in there, leave them! You’ll risk overworking your batter if you fully incorporate half the mixture.
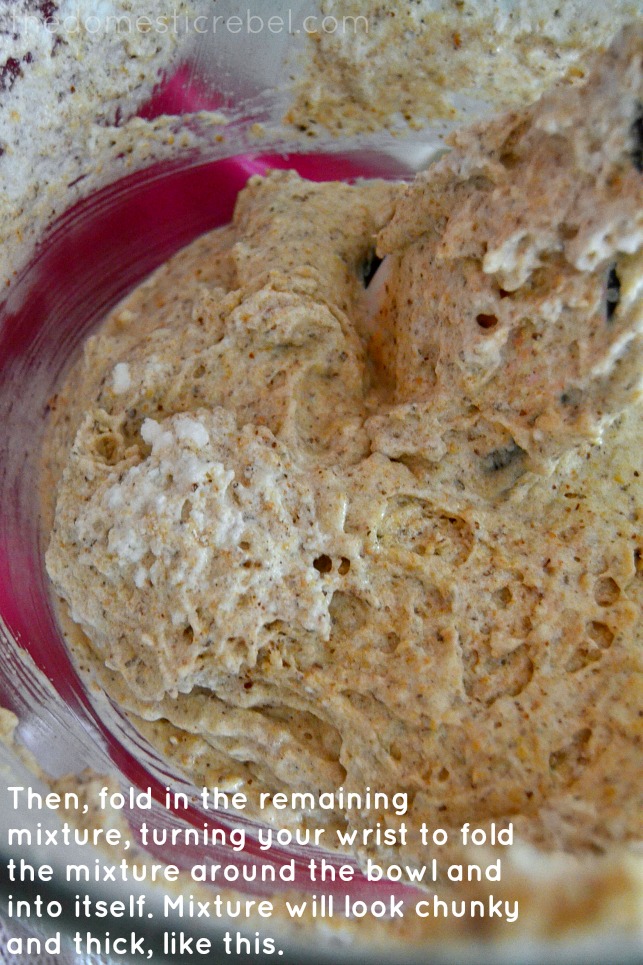 Then, fold in the remaining mixture. Turn your wrist to fold the mixture around the bowl and into itself. If it helps, think of it like a clock. Start at 12 and work your way around the clock, going clockwise, until about 11, then cut into the middle of the clock. Work back to 12 and start again. Again, do not overmix! The mixture is ready when it looks thick and kind of chunky looking, like this (almost like wet cement). If you draw your spatula through the mixture, the line from your spatula should disappear back into the mixture within a few seconds.
 Remember my tip about the almond meal? See those brown specks in there? Some are from the Nutter Butters, but some are from the almond skin in the meal. If you’d prefer a plain, tan color for these macaron shells, I’d seek out blanched almond meal, which would omit any almond skin from peeking through.
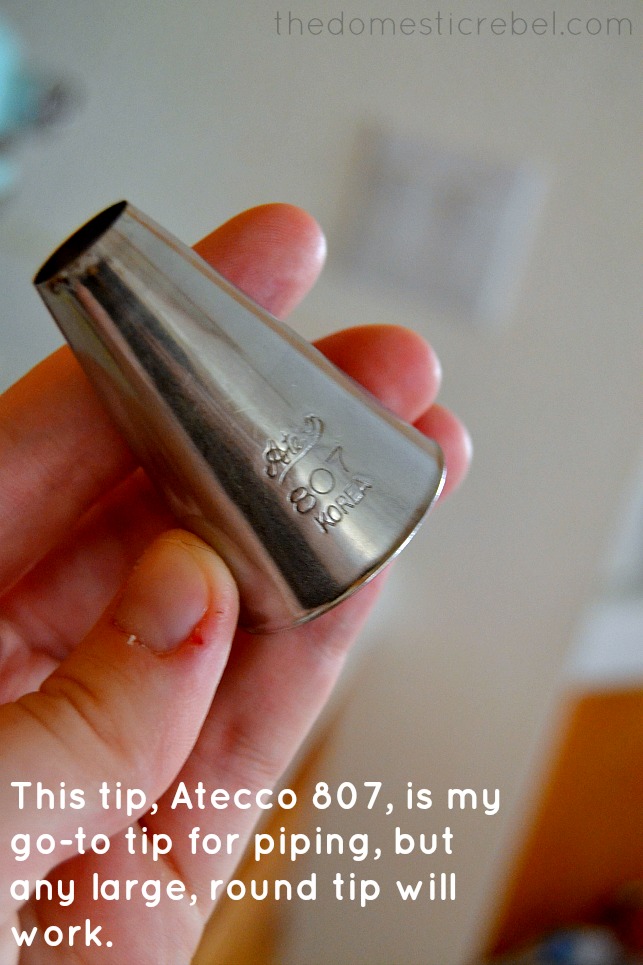 My Atecco 807 tip is my go-to tip for piping macarons. It’s a large, open-circle tip that works well for frosting or piping, and I use it pretty much all the time! If you don’t have this tip, don’t fret – any large, round tip will work. However, please be advised that I don’t recommend just snipping off a corner of a baggy when piping these macarons. The shape will be wonky, and it won’t bake up properly. Please use a professional tip.
Now, attach the tip to a disposable piping bag and fill ‘er up.
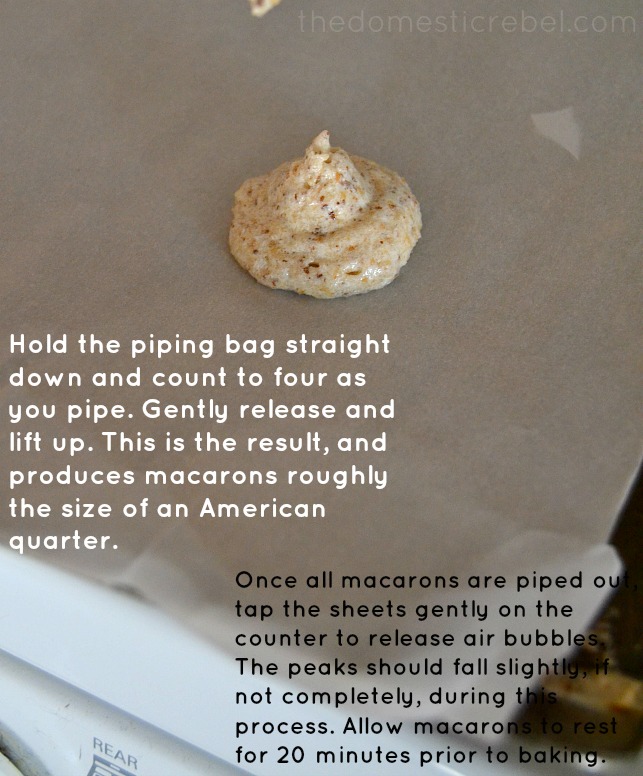
Hold the bag straight down and gently squeeze the bag to release the flow of macaron batter, counting to four. This should equal a circle roughly the size of an American quarter. Gently flick your wrist to stop the flow of the macaron. This will leave that lump on top – but don’t fret. You can either: Lightly wet your finger and gently pat down the lump or wait for it to soften and deflate (what I do).
Once all the macarons are piped onto your baking sheet or baking mats, gently tap the entire sheet pan onto the counter a couple times. This releases the air bubbles from within the macarons, allowing them to properly rise and create that chewy interior without being cracked or completely hollowed. After tapping the macarons on the counter, leave them on the counter for 20 minutes before baking. This allows the macarons to briefly form a slight “shell” on top which helps create that crispy top everyone knows and loves. And it allows some more time for that peak to fall back down into the macaron.
At this point, after tapping the macarons, I would preheat your oven to 275* degrees F.
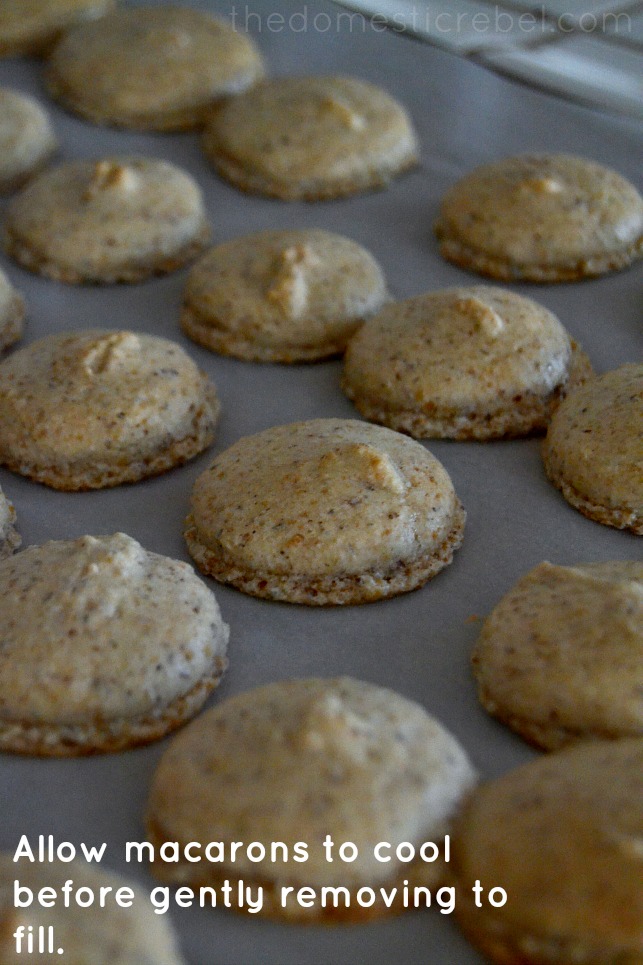
Bake the macarons for 12-14 minutes, rotating the pans halfway through baking time. I cannot stress that enough! Mine take exactly 13 minutes. I’ll put them in for 6 minutes and 30 seconds, bake them, then rotate the pans and bake them for another 6 minutes and 30 seconds. Allow macarons to cool on the baking sheets before gently removing. They should come right off or come off with little resistance.
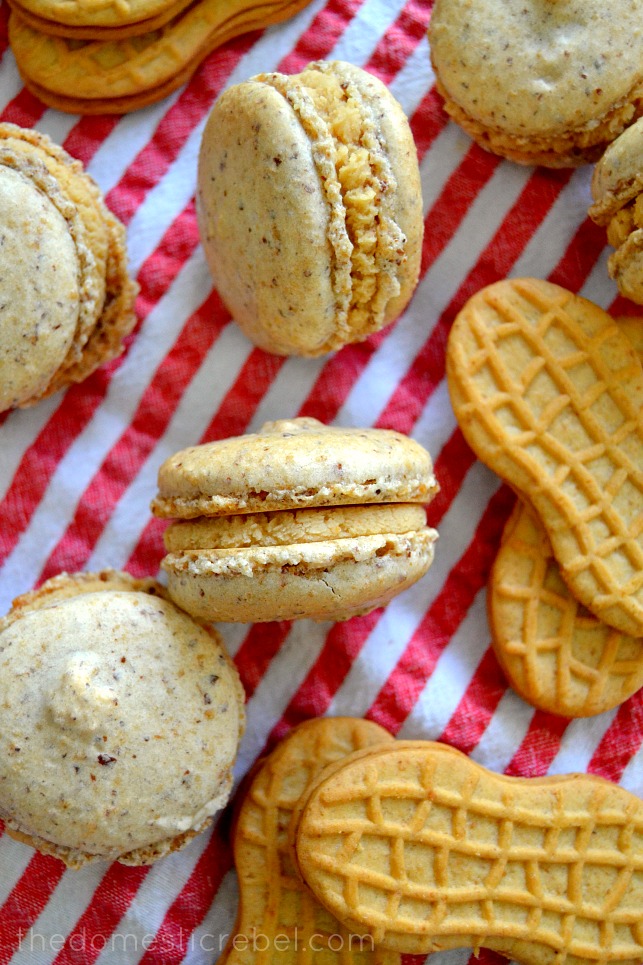
And then, all that’s left to do is frost them up, gently sammich them together, and EAT THE LIVING HELL OUT OF THEM!
 And if you’re like me, you’ll be inhaling them soon enough. OMGTHEY’RESOGOOD.
Nutter Butter Macarons & A Simple Macaron-Making Tutorial
Ingredients
- 2⅓ cups powdered sugar
- 3.5 oz almond meal like by Bob's Red Mill
- 3.5 oz Nutter Butter Cookies filling scraped out and reserved and cookie pieces pulverized into a fine crumb (about 10-12 Nutter Butters)
- 4 egg whites
- 1/3 cup white sugar
- FOR FILLING:
- Reserved Nutter Butter filling from about 10-12 Nutter Butter Cookies
- 1 stick butter softened
- 1/3 cup creamy peanut butter
- 1 tsp vanilla extract
- About 1.5 cups powdered sugar
Instructions
- First, measure your ingredients out properly. On a kitchen food scale, measure out 3.5 oz of almond meal and 3.5 oz of pulverized Nutter Butter shells. Pour both into a bowl with the powdered sugar. Place a large handheld sifter over a separate bowl and begin sifting the dry ingredients together until blended and sifted.
- If you have harder "pebbles" leftover, either push them through the sifter with your spatula, or remove them to re-pulse through your food processor, then try resifting them. If there's a teaspoon or less of the harder "pebbles", you may discard. Set sifted ingredients aside.
- Bring a large pot filled with 1-2" of water to a simmer. Place your stand mixer bowl over the pot of water and immediately add in the egg whites and white sugar. Whisk quickly for about 30 seconds or until the mixture is frothy and bubbly. Do NOT overmix. Immediately remove from the heat, wipe off the bottom of the bowl, and attach to your stand mixer base. Using the whisk attachment, begin whipping the egg white mixture on HIGH for about 5-7 minutes or until stiff, glossy peaks form.
- Remove the whisk attachment and gently stir in HALF of the sifted mixture. Do not fully stir this mixture in; just fold it in maybe 4 or so times and then add the rest. Turn your wrist clockwise around the bowl, folding the mixture around and in on itself to incorporate the dry, sifted ingredients. The mixture should look like a little thick and chunky when it's done. If you draw an invisible line through the mixture with your spatula, the line should disappear within the mixture in a couple of seconds.
- Line two baking sheets with parchment paper, making the parchment the same dimensions as your baking sheets. Conversely, you may use silicone macaron mats if you have them. Do not grease the mats, the parchment, or the sheets.
- Scoop the macaron mixture into a large disposable piping bag affixed with a large open-circle tip (I used Atecco 807). Hold the bag straight down and gently squeeze to release the batter, counting to four. Flick your wrist to stop the flow. This should translate to a macaron roughly the size of an American quarter. Repeat with remaining macarons. Macarons may have slight lumps on top; either use a lightly wet finger to gently pat it down, or follow the recipe accordingly. Once macarons are all piped on, gently tap each sheet a couple of times on the counter to release air bubbles and help those lumps fall. Allow the macarons to sit on the counter for 20 minutes prior to baking. During this time, preheat your oven 275* degrees F.
- Bake the macarons for approx. 12-14 minutes, rotating pans halfway through baking time to ensure even baking. Mine bake at EXACTLY 13 minutes. Remove the macarons gently and allow them to cool on the baking sheets. Macarons should come right up or peel off with little resistance.
- To make the filling, in the clean stand mixer bowl, beat together the butter, peanut butter, vanilla and Nutter Butter filling with the paddle attachment for about 1 minute or until creamy. Beat in the powdered sugar until a soft yet thick and spreadable mixture has formed. Place the mixture in a piping bag attached with a smaller open circle tip and pipe onto the flat surface of a cooled macaron; sandwich with a remaining macaron top.
- Serve immediately. Macarons are best the same day or the next day. To store macarons, gently place them in a large airtight container and place them in on the counter. You may also cover them airtight and place them in the fridge, but allow them to come to room temperature completely before eating.
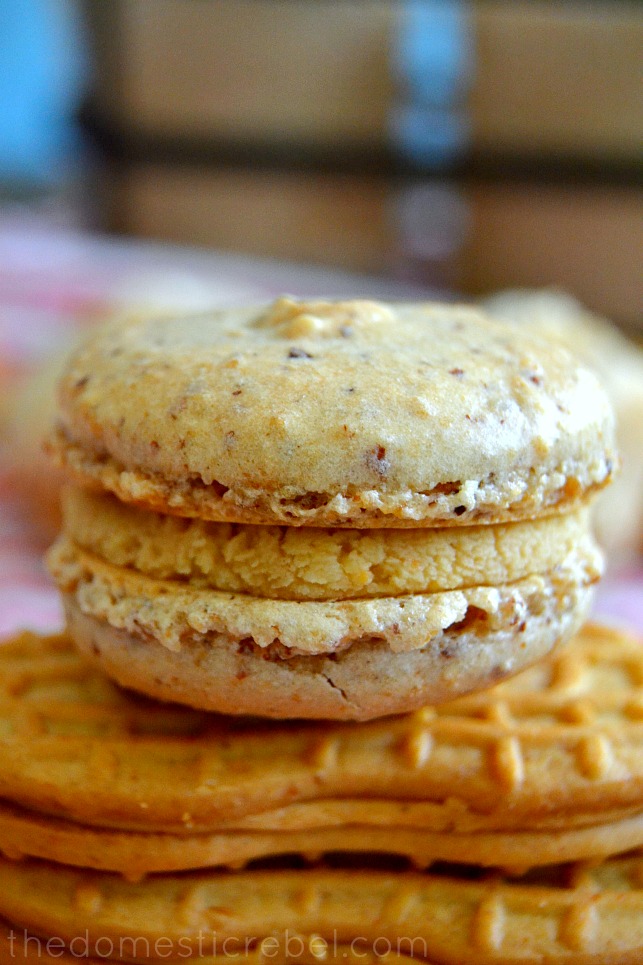
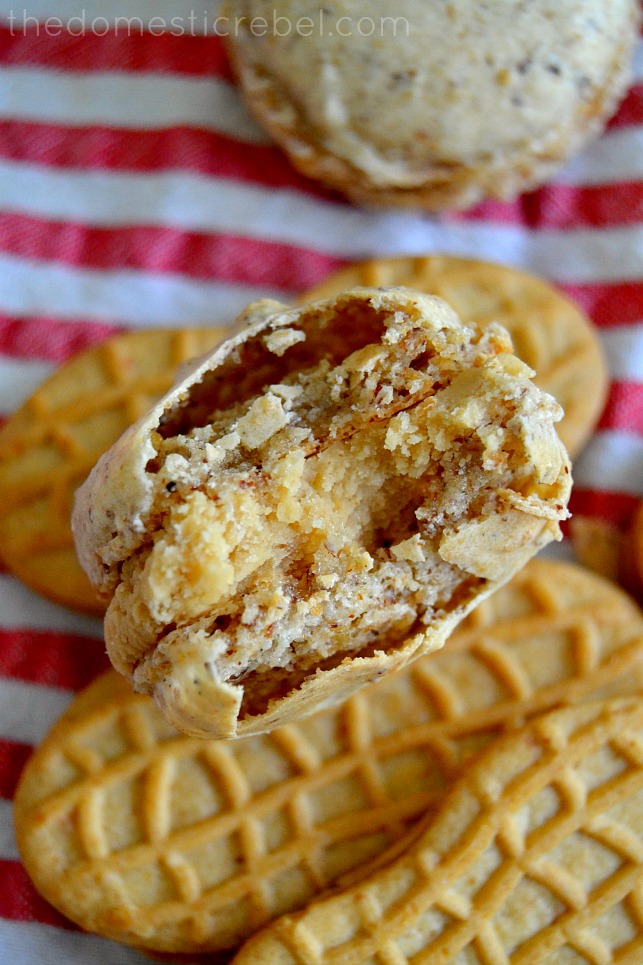 Oh. Em. Geeeeee. The Nutter Butter filling is just exquisite, people. Creamy and thick, sweet-and-salty, and so luscious in contrast to the crisp shells of the macarons with their tender and chewy interior. FABULOUS, and all made from scratch, at home, without being French. How’s that for a macaron?! 🙂
Stay tuned, because I have another classic cookie-to-macaron recipe coming soon!
 Have a sweet day!!
xo, Hayley
celyn says
wow this looks like a fantastic flavor for macarons! thanks for sharing!
styleandchocolates
thedomesticrebel says
Thank you, Celyn! 🙂
tanya says
You did bang up job on this tutorial, I almost think I could make them! Or you could just send them to me? I’ll take the Nutter Butter Macarons I can get!
thedomesticrebel says
Thanks so much, Tanya! And you totally CAN make them! Seriously, they’re a lot easier than they seem — they can just be a little pesky and they are labor intensive. That’s all! 🙂
Erin @ Miss Scrambled Egg says
Okay, I just want to say kudos to this tutorial. I’m afraid of making macarons. I tried once and they came out looking crazy. I love buying them in NYC when I go and will spend money on these babies because I know how much time goes into making them. I LOVE THIS RECIPE. I need to try to overcome my fears and work through your guiding light of a tutorial. Thank you!
thedomesticrebel says
Erin, giiirl I’m with you! Anytime I’m in NYC I spend like, $100 at Laduree (wish I was joking!) because their macs are my favorite. These definitely aren’t on Laduree’s level (I’m convinced I actually would have to be French and living in France to make Laduree-level macs!), but they are really, really freakin’ good. I hope my tutorial helps ease your fears! 🙂
LauriM says
Ok, I am really excited to try these. I feel like I actually might be able to make them and I just so happen to have a package of Nutter Butters waiting for some use!
thedomesticrebel says
First of all: Yay, Lauri! You can do it! Second of all: HOW do you have a package of Nutter Butters just waiting around? Even when I was grinding up the cookies for these macarons, I was snacking mercilessly on them. Let me know how they turn out!
Dorothy @ Crazy for Crust says
They are gorgeous and AMAZING. I tasted them – best macarons ever.
thedomesticrebel says
Thanks Dorothy! Glad I got your seal of approval – it says a lot since I was the only one devouring these in my home! 🙂
Michelle { A Latte Food } says
Whaaat? Nutter butter macarons might be the best thing I have ever heard. Ever. Nutter butters are life. I cannot wait to try this recipe!
thedomesticrebel says
Michelle, I’m totally with you. My love for Nutter Butters is boundless. Thanks for stopping by! xoxo.
Julianne @ Beyond Frosting says
I seriously need to try these! Nutter butters are my favorite! And while I am not a huge fan of macaroons (gosh I know!), these look pretty amazing!
thedomesticrebel says
Julianne – it’s okay! I forgive you, even if you dislike possibly my favorite dessert 😉 More for me!!
Lindsay @ Life, Love and Sugar says
Love them! And I love your step by step!! Makes me feel like I actually want to attempt macarons for the first time! 🙂
thedomesticrebel says
Lindsay, I struggle to think of anything you couldn’t accomplish! Your cakes are seriously some of the prettiest I’ve ever seen! I’ll bet your macarons will be gorgeous.
Kayle (The Cooking Actress) says
One day you’re trying your first macaron and the next you’re posting a kickass tutorial and ridiculously delicious nutter butter ones! *sniffle* my little Hayley’s all growed up
😛
Tonia from TheGunnySack says
I’m pretty sure these are the best macarons I’ve ever seen! I love Nutter Butters! Pinned!
thedomesticrebel says
Eek, thanks so much Tonia 🙂 I love me some Nutter Butters too!
Heather @ Sugar Dish Me says
This tutorial is AMAZING!!! You are so smart. I have never made macarons. I think I’m skeered. Or not patient. Or D. All of the above. But these peanut butter awesome macaron cookies are insanely awesome! You deserve to be proud like a cookie mama.
thedomesticrebel says
I am so a proud cookie mama 🙂 and dude, I was skeered myself for the longest time. I’m still scared of the following: candy thermometers, waffle makers, and large pots fit for deep frying since apparently I do not have the proper pot. < - well, that too. I mean...
Alice @ Hip Foodie Mom says
ok so today is apparently National Macaron Day . . and I LOVE Nutter butters, like love like them .. like they are my fave store bought cookies. . I love these, Hayley!!!! so glad I found these today!!! woot woot!!!
thedomesticrebel says
Alice, you’re so sweet – thanks for your kind comment. <3 And National Macaron Day?! I MUST CELEBRATE!!
Renee @ Tortillas and Honey says
Thanks for a great tutorial making macarons! Making macarons is one of my goals this year, definitely! And it’s so absolutely awesome that you made them with nutter butters!!
thedomesticrebel says
Thanks so much, Renee! They’re not the easiest cookie to make, but I hope my tutorial will help people navigate the delicious waters of macaron-baking!
Kelly - Life Made Sweeter says
Nutter butter macarons? Girl you are a sweet genius! They look absolutely perfect! Love the awesome tutorial!
thedomesticrebel says
Kelly, thanks so much! xoxo.
Stacy | Wicked Good Kitchen says
Wow! Girl, this tutorial ROCKS! I cannot even imagine how long this post took you with all the photos, tips in text right on the photos, and the tutorial and recipe. You are AH-MAZING! Meanwhile, Nutter Butter Macarons? Simply brilliant! You are a genius baker, my friend. 🙂 Thanks for sharing and have a great week ahead! xo
thedomesticrebel says
Oh, thanks so much for your kind comment, Stacy! You’re the sweetest! 🙂 And it did take awhile, but it’s worth it – I want everyone to know how simple macs can be if you have the right steps and tricks to prepare them. Thank you! xoxo.
Thalia @ butter and brioche says
Aren’t macarons just the best thing ever! These are perfection and I bet they tasted incredible too.
thedomesticrebel says
Thanks so much, Thalia! xoxo.
Megan {Country Cleaver} says
Look at them little macaron feetsies!!! Perfection!
thedomesticrebel says
Thank you mucho, Megan!! xoxo.
Whitney says
Oh. My. God. I need these in my belly, STAT.
thedomesticrebel says
Thanks Whitney! xoxo.
Shawn @ I Wash You Dry says
These. Are. So. Awesome. You turned a tricky recipe into one that looks essential in my diet. Bravo.
thedomesticrebel says
Shawn, you’re awesome and thanks so much! xoxo!
Tina says
This is the best tutorial I have seen! Thank you for the step-by-step instructions. I can’t wait to make them…They look delicious!
thedomesticrebel says
Tina, so glad! Thank you. You’ll love them!
Loreene Jalbert says
I came across your recipe and can’t wait to try as I’ve tried Italian & French macarons and I noticed you have called your Nutter Butter Macarons French method, but in fact I’m sure it’s Swiss method and every thing I have read on Swiss macaron method it’s the hardess so I can’t wait to try as I had’t found a recipe I’d like to try. It’s a great step by step ttutorial
David says
This was a disaster! Followed the directions exactly. Even at TWENTY minutes they were still wet inside! (And yes, I checked my oven temperature!) And the filling was SO stiff I popped the filler bag trying to squeeze the filling out! Won’t be trying these again. At least now I have a bag of leftover Nutter Butter cookies!
thedomesticrebel says
So sorry there were problems, David! I’m wondering if the macaron batter was over-mixed, as sometimes it turns almost like cement! It’s very easy to accidentally overmix, I do it often.
Mindy says
I made these today, they came out so good!!!!! I made them using the Italian method. I also whipped the filling, it came out so fluffy and creamy. The taste is amazing.